
Wing Foil Gybe Part 5 – Foiling Toe to Heel Gybe
Technique / Wing Foil

Introduction
Just when you thought you could enjoy sitting on your laurels, the latest Tonic drops and you’ve been gifted yet another challenge. There is of course a carrot dangling here, as the toe to heel foiling gybe is another step towards staying up on the foil for longer, whilst also doubling as an extremely effective method of turning around. And just in case you need any more encouragement, this is a turn that can, and dare we say will, feel so utterly divine.
Hopefully you’ve been practicing the previous iteration, the heel-to-toe gybe, and have also given the woffing toe to heel a go? If so, you’re up to speed with what a gybe is, your bearings are set, your wing flips are practised and therefore the green lights are flashing for this bad boy. All systems go! However, you may be wondering why another gybe? It’s a fare question. If you come from windsurfing, you’ll likely be asking the same. The reason is that pretty much all of us have a favoured foot forward. We have discussed this previously, but mark our words, you’ll find it considerably less difficult to gybe toe to heel with you good foot forward, than heel to toe with your least favourite foot forward. For many of us a toe to heel turn is a more natural movement. Once you nail a heel-to-toe on your favourite side and keep going toe side, you can then go straight into one of these, a killer combo! We should also add that once you learn the foot change (coming soon) you’ll be able to quickly change feet and then toe to heel gybe, just as we did in the woffing toe to last heel issue:)


As always, we highly recommend that you give this a go when the conditions are what you may consider as friendly and we should of remind you that as you’ll be turning around you need to have a very good look before doing so.

There’s also an accompanying video, so do have a watch!
Right, let’s get on with it..
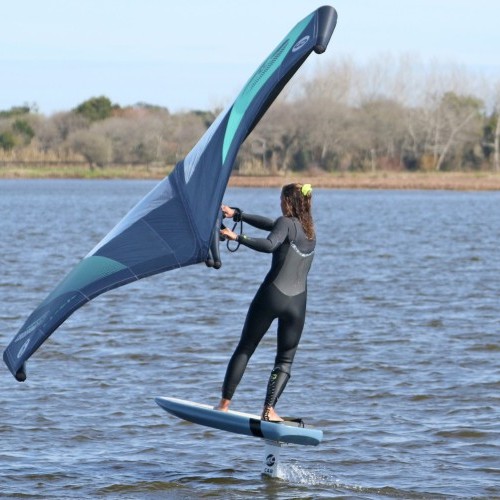
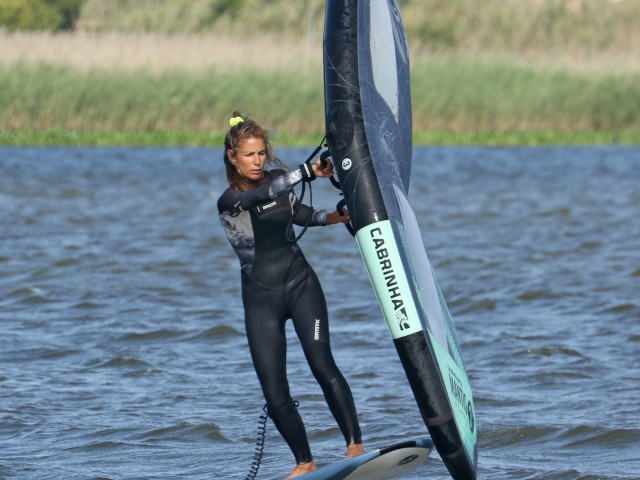
Be Ready. Pic A
First things first. We say this every time but to give yourself the best chance of success you need a consistent starting point. If you start from the same place each time you can build on your gybe every attempt. Ideally you want to be riding upwind. This way you’ll know where you are in relation to the wind and you’ll have your bearings. You also need to be in a
balanced dynamic position so that you can control the board throughout your gybe. This is only possible if your feet are working with you. If you’ve got a good toe side position your back foot should be across the board enough that you can weight the balls of your feet. This means that the heel of your back foot will be facing across the board, just behind or on the centreline. Your front foot should be pointing slightly forward and should be on the downwind side of the board. You’ll know if your feet are right as it should require very little physical effort to keep the board trimmed, both from nose to tail and rail to rail as you’ll be using your weight rather than strength. You can see in the photo that Karine is riding upwind in a good balanced toe side position. Her feet are set, ankles flexed, upper body open. She’s got her wing powered, sheeted to the wind and centred so that she’s cruising upwind. Now a quick look round to check that the coast is clear and you’re ready!
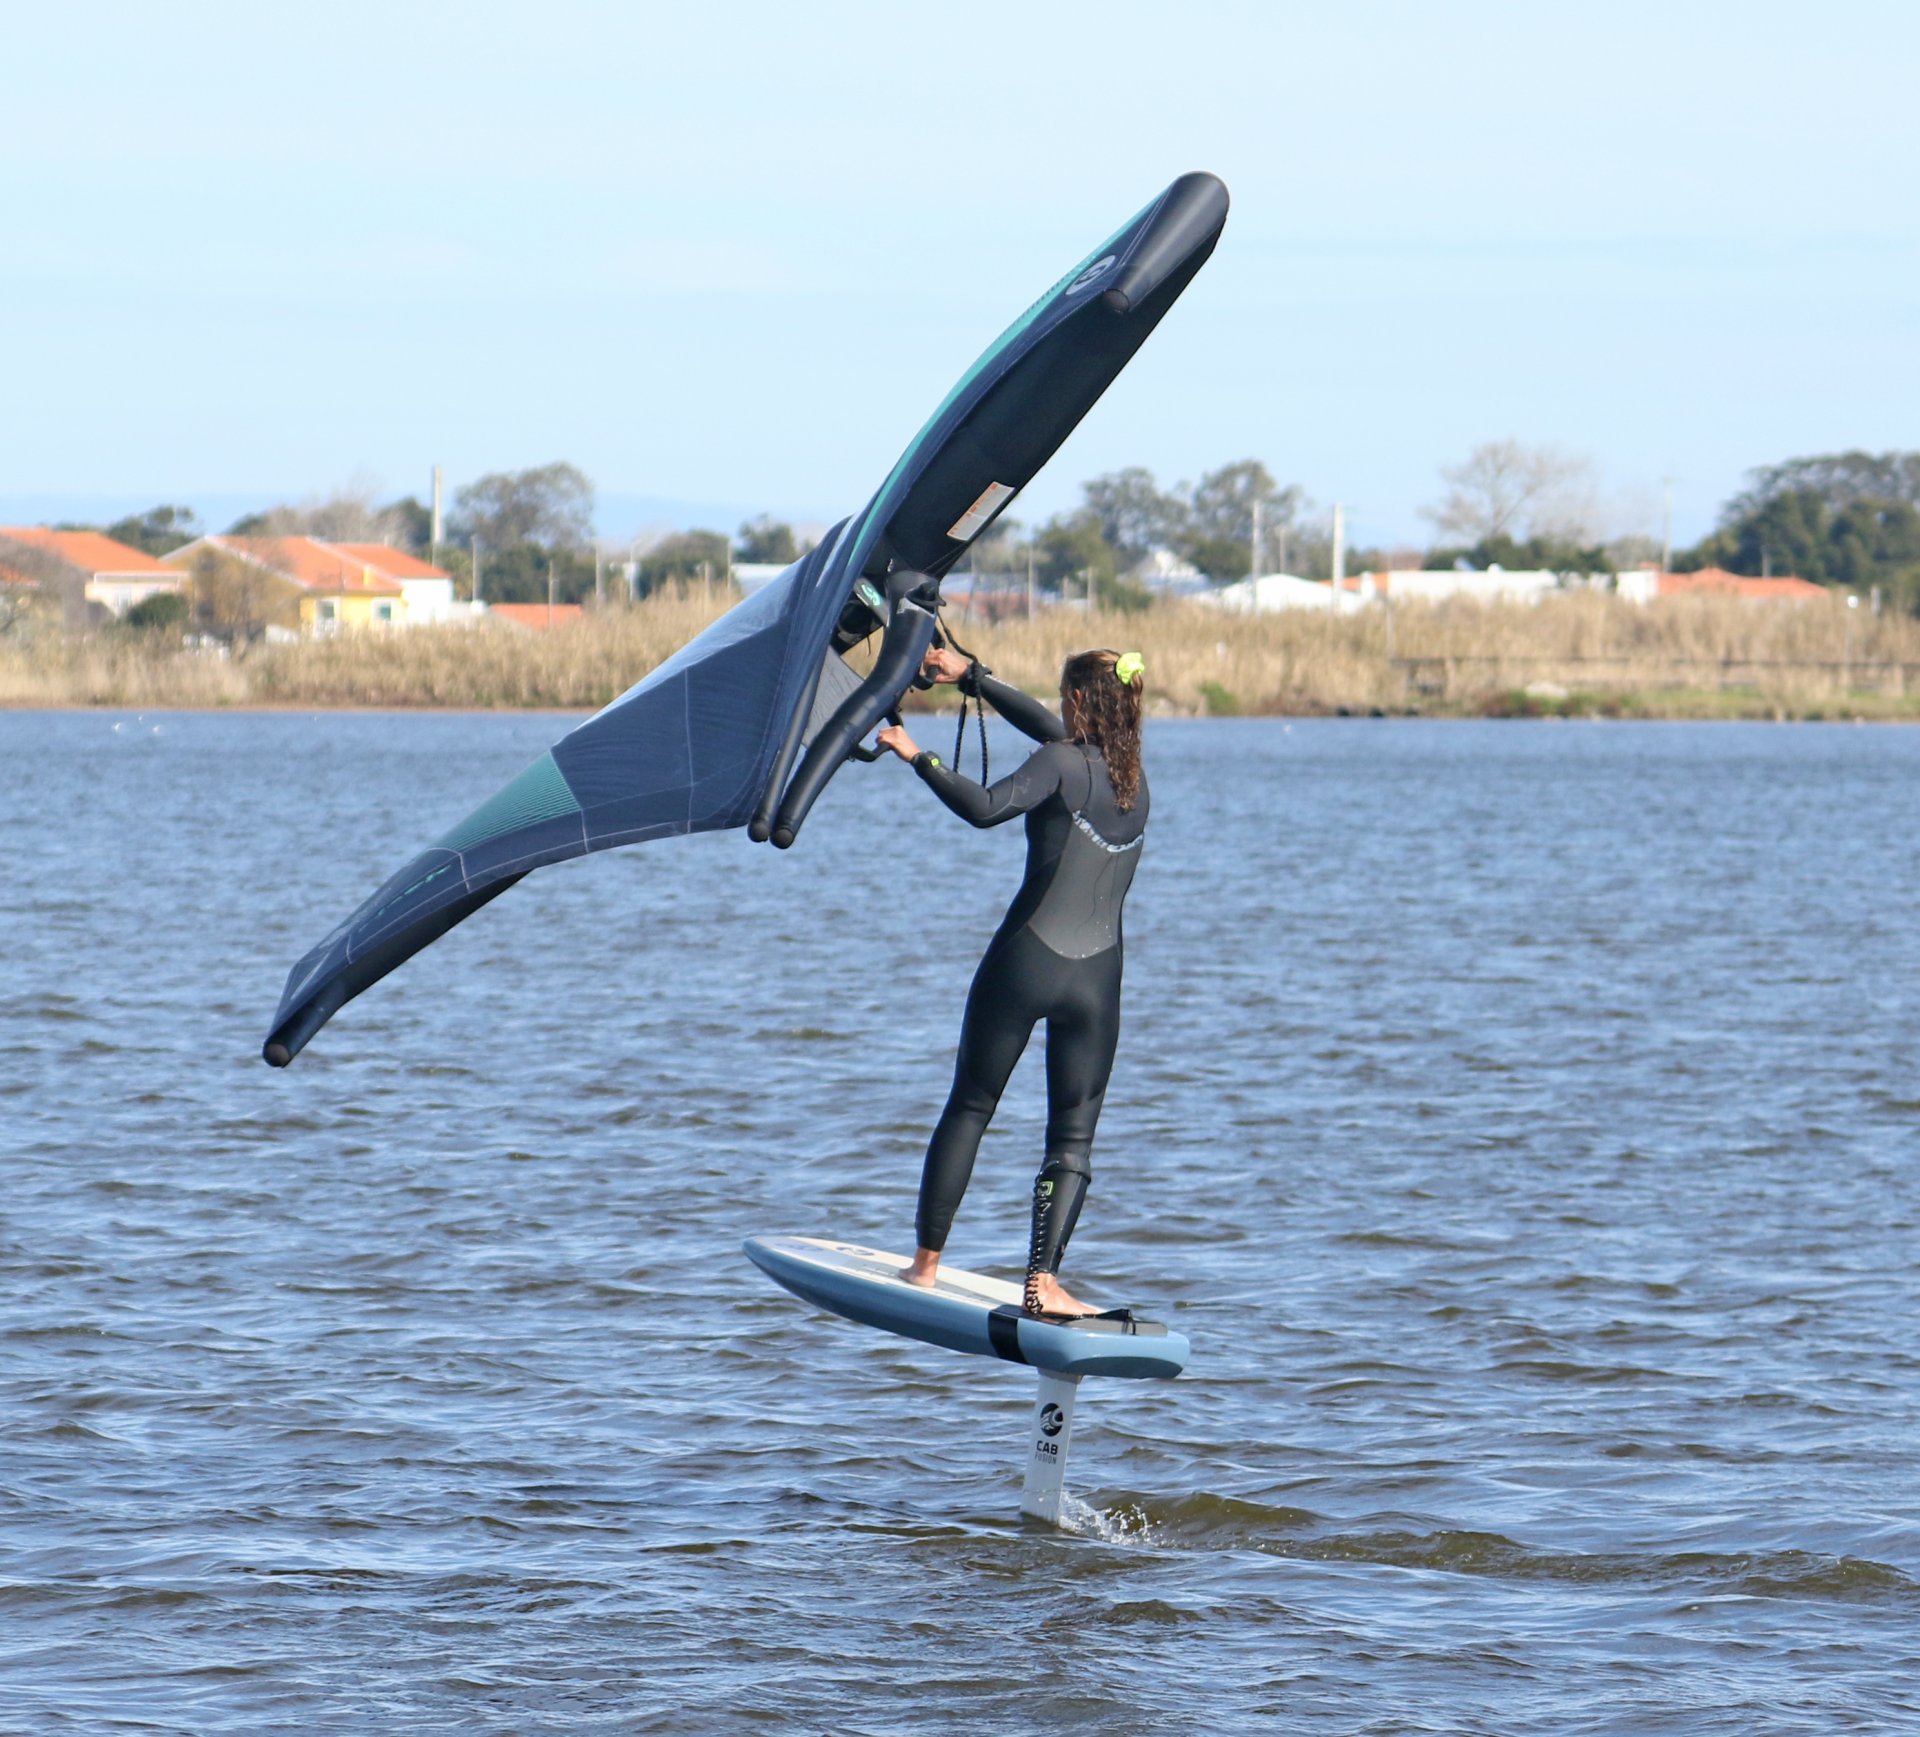
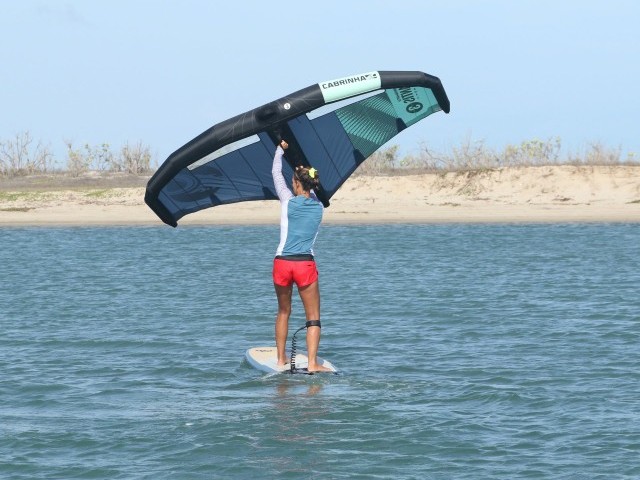
Bearing Away. Pic B
For this gybe your bearing away does not need to be as extreme. However, its purpose is no less significant. The reason to bear away is that it will get you and everything else in position for your gybe. By moving the wing forward and away, extending your front arm, the wing will lift you over the board, this effectively trims the board rail to rail so that you’re standing on it, weight on both feet. It also turns the board off the wind, starting your gybe. This means that you’re balanced, and so is your board and foil. By pointing the wing forwards, you’ve positioned it where you want it for the first part of your gybe. And finally, as a little bonus, this action will lift you a touch. Starting slightly higher gives you more room to get round on the foil. Here Karine is now standing over her board, she’s come up a tad, the board has started to turn and her wing is pointing forward. Your gybe has been set into motion.

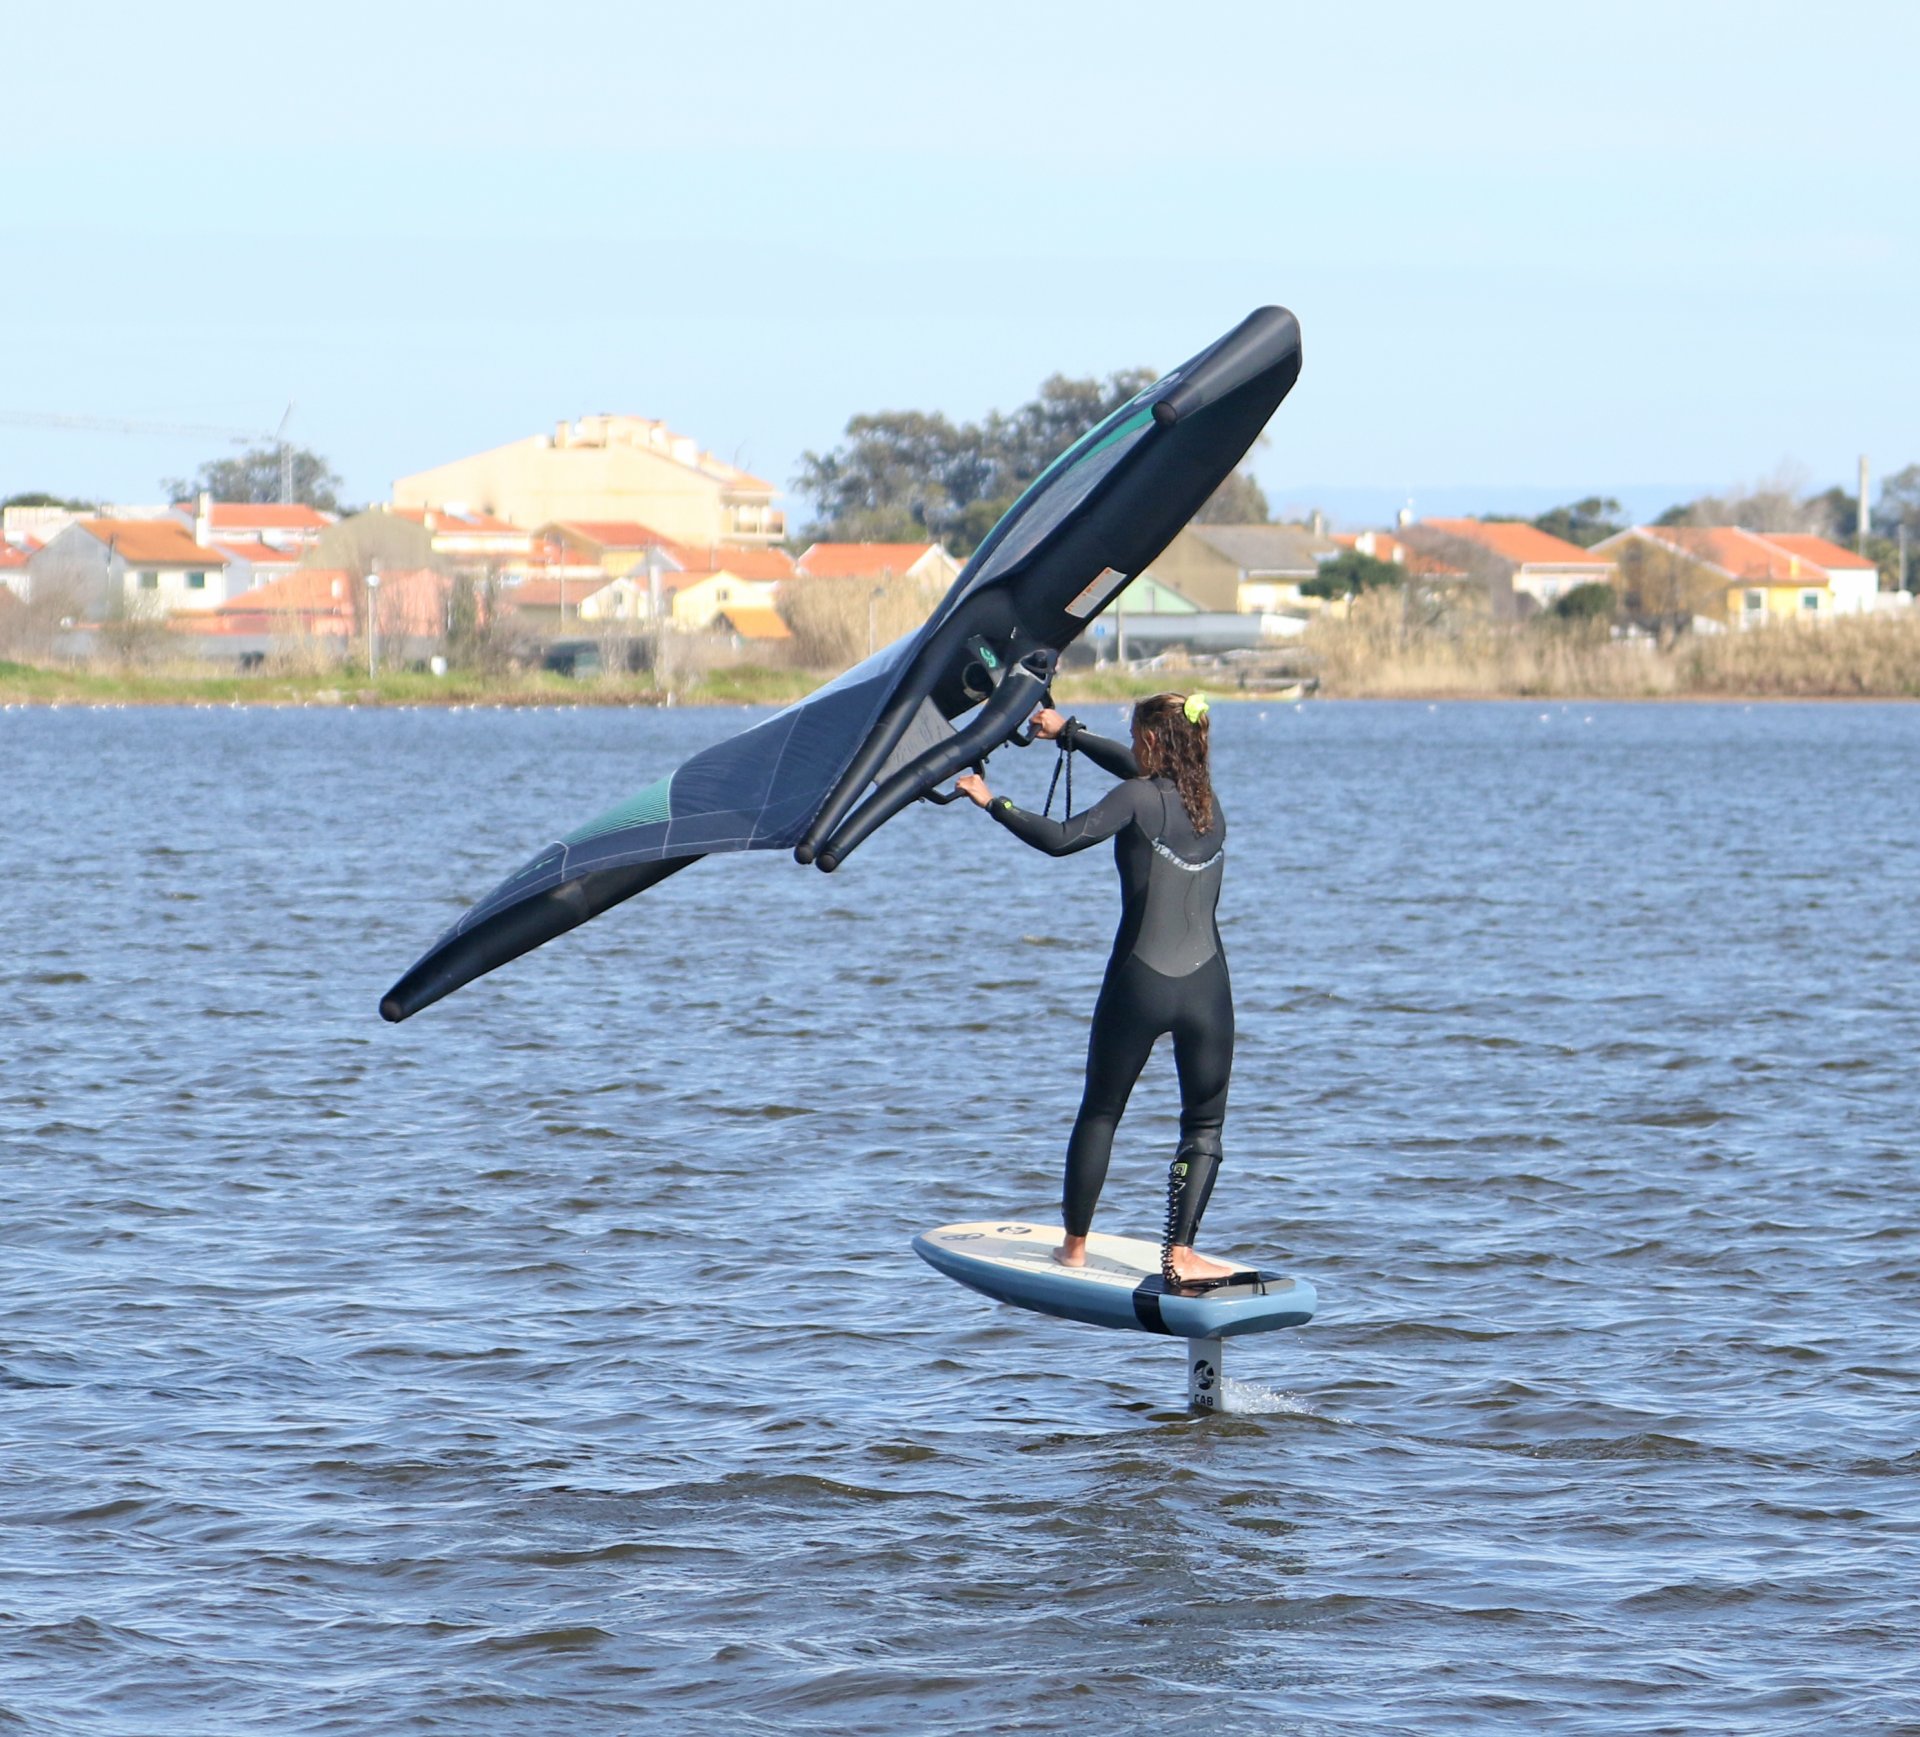
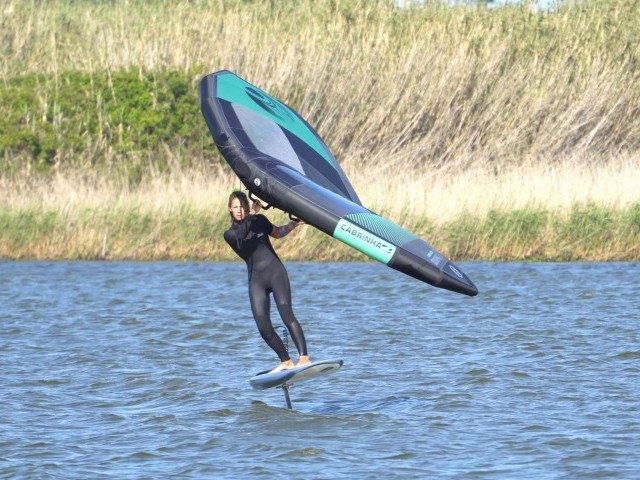
The Carve. Pic C
Realistically when we talk about carving, we mean turning the board by transitioning your weight. By bearing away your weight went from the balls of your feet onto all of your feet. Now you’re moving it a bit further towards your heels. This is why your foot position is important, you want the weight shift to help. Yet again you don’t need anything extreme, just enough to get the board turning whilst you remain balanced.
Whilst keeping the wing forwards, flex your legs, drop your bum and twist your hips as if you’re trying to point them downwind. Keep your shoulders centred over the board, and your chin up. With your wing pointing forward, it will help keep your board trimmed, even as your weight drops. This is a dynamic position which you can practice on land. You can see that karine is dropping her weight, twisting and opening her hips and holding her wing forward. The result is that her weight gently transfers onto her heels. With her head held high Karine remains balanced over the board. Note that her wing is still powered and sheeted to the wind and that her head and shoulders have not turned into the turn.
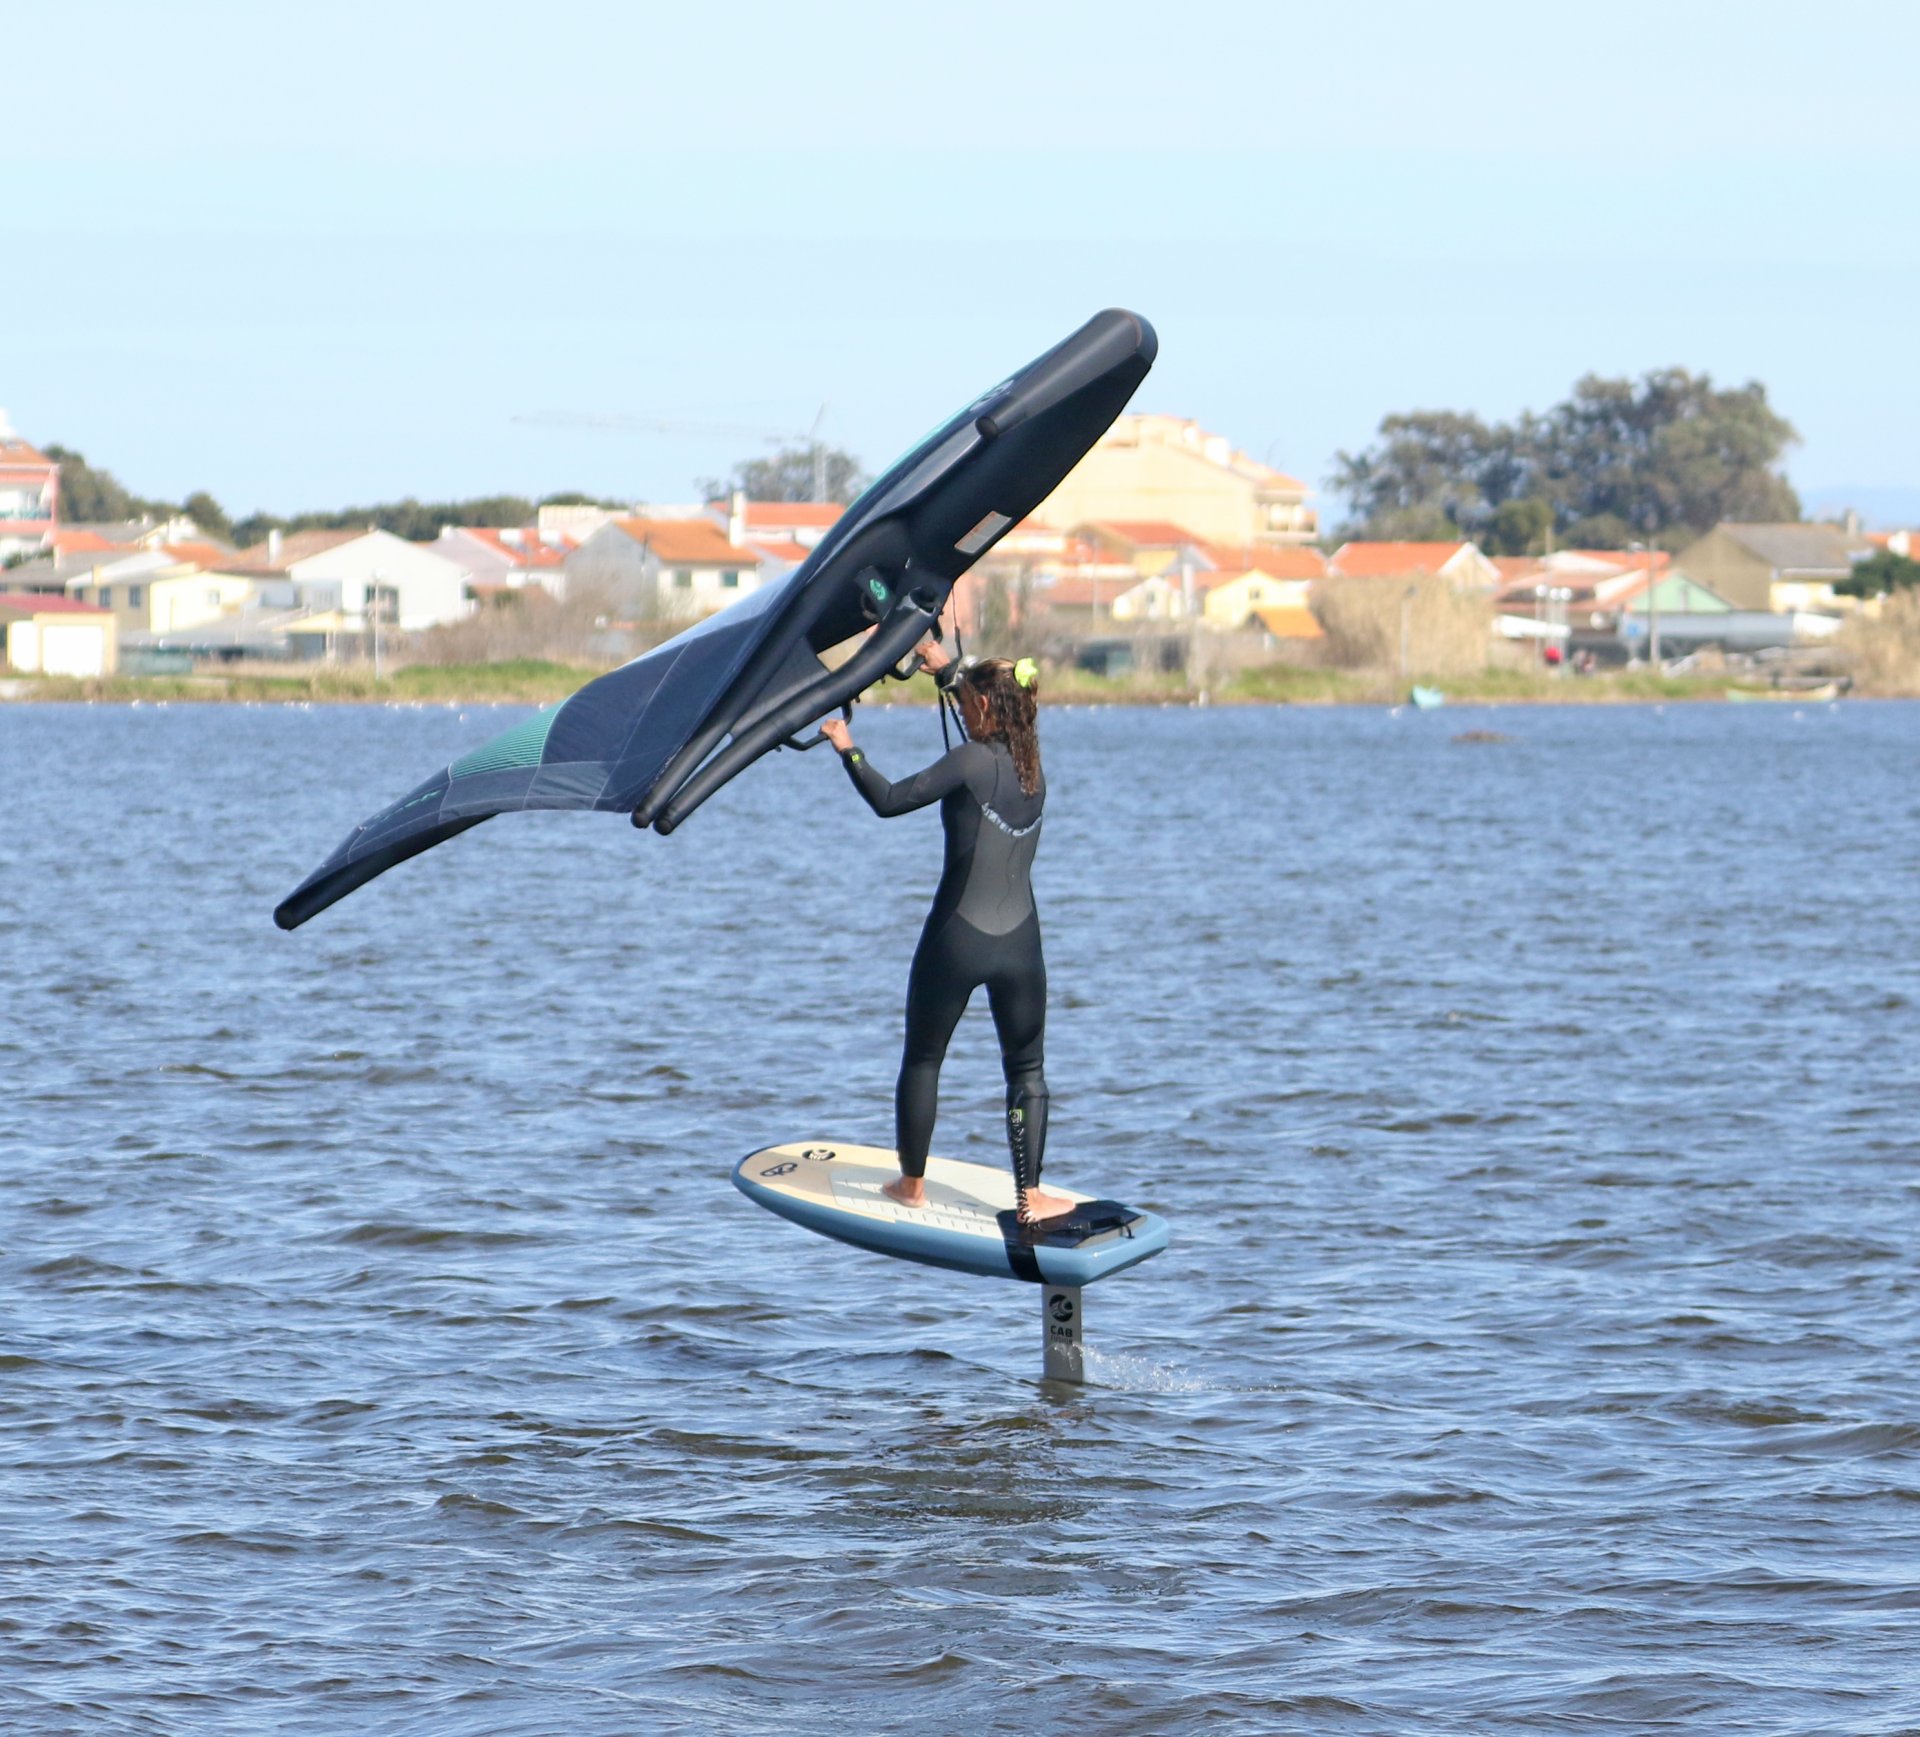
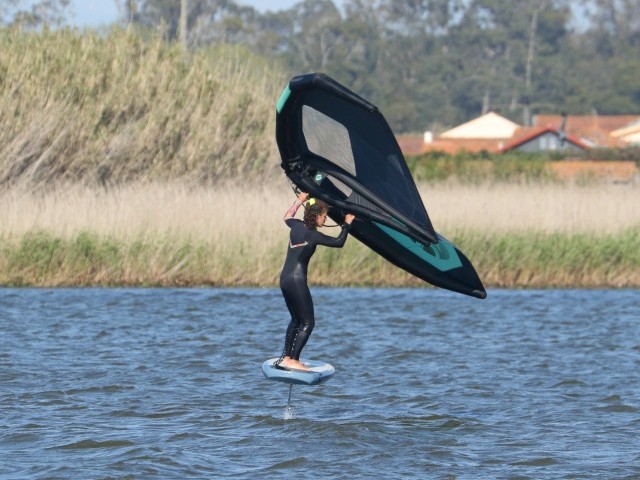
Keep Turning. Pic D
In essence, you’re aim is to maintain your position, and therefore, keep turning/carving. However, you’re not frozen in a static position. You still need to keep the power on and trim the board from nose to tail to stop yourself breaching or dropping down. As your board turns further off the wind your lower body needs to follow, whilst your upper body holds the wing in a similar position. This allows you to keep power in the wing, and also helps keep you balanced and centred over the board, and keep your weight on both feet. As Karine approaches downwind you can see that the angle of her wing hasn’t changed, she’s still catching wind, but by twisting at the waist her lower body is turning with the board. It’s important to keep some flex in your knees. If you stand bolt upright, you’ll get stuck in position.
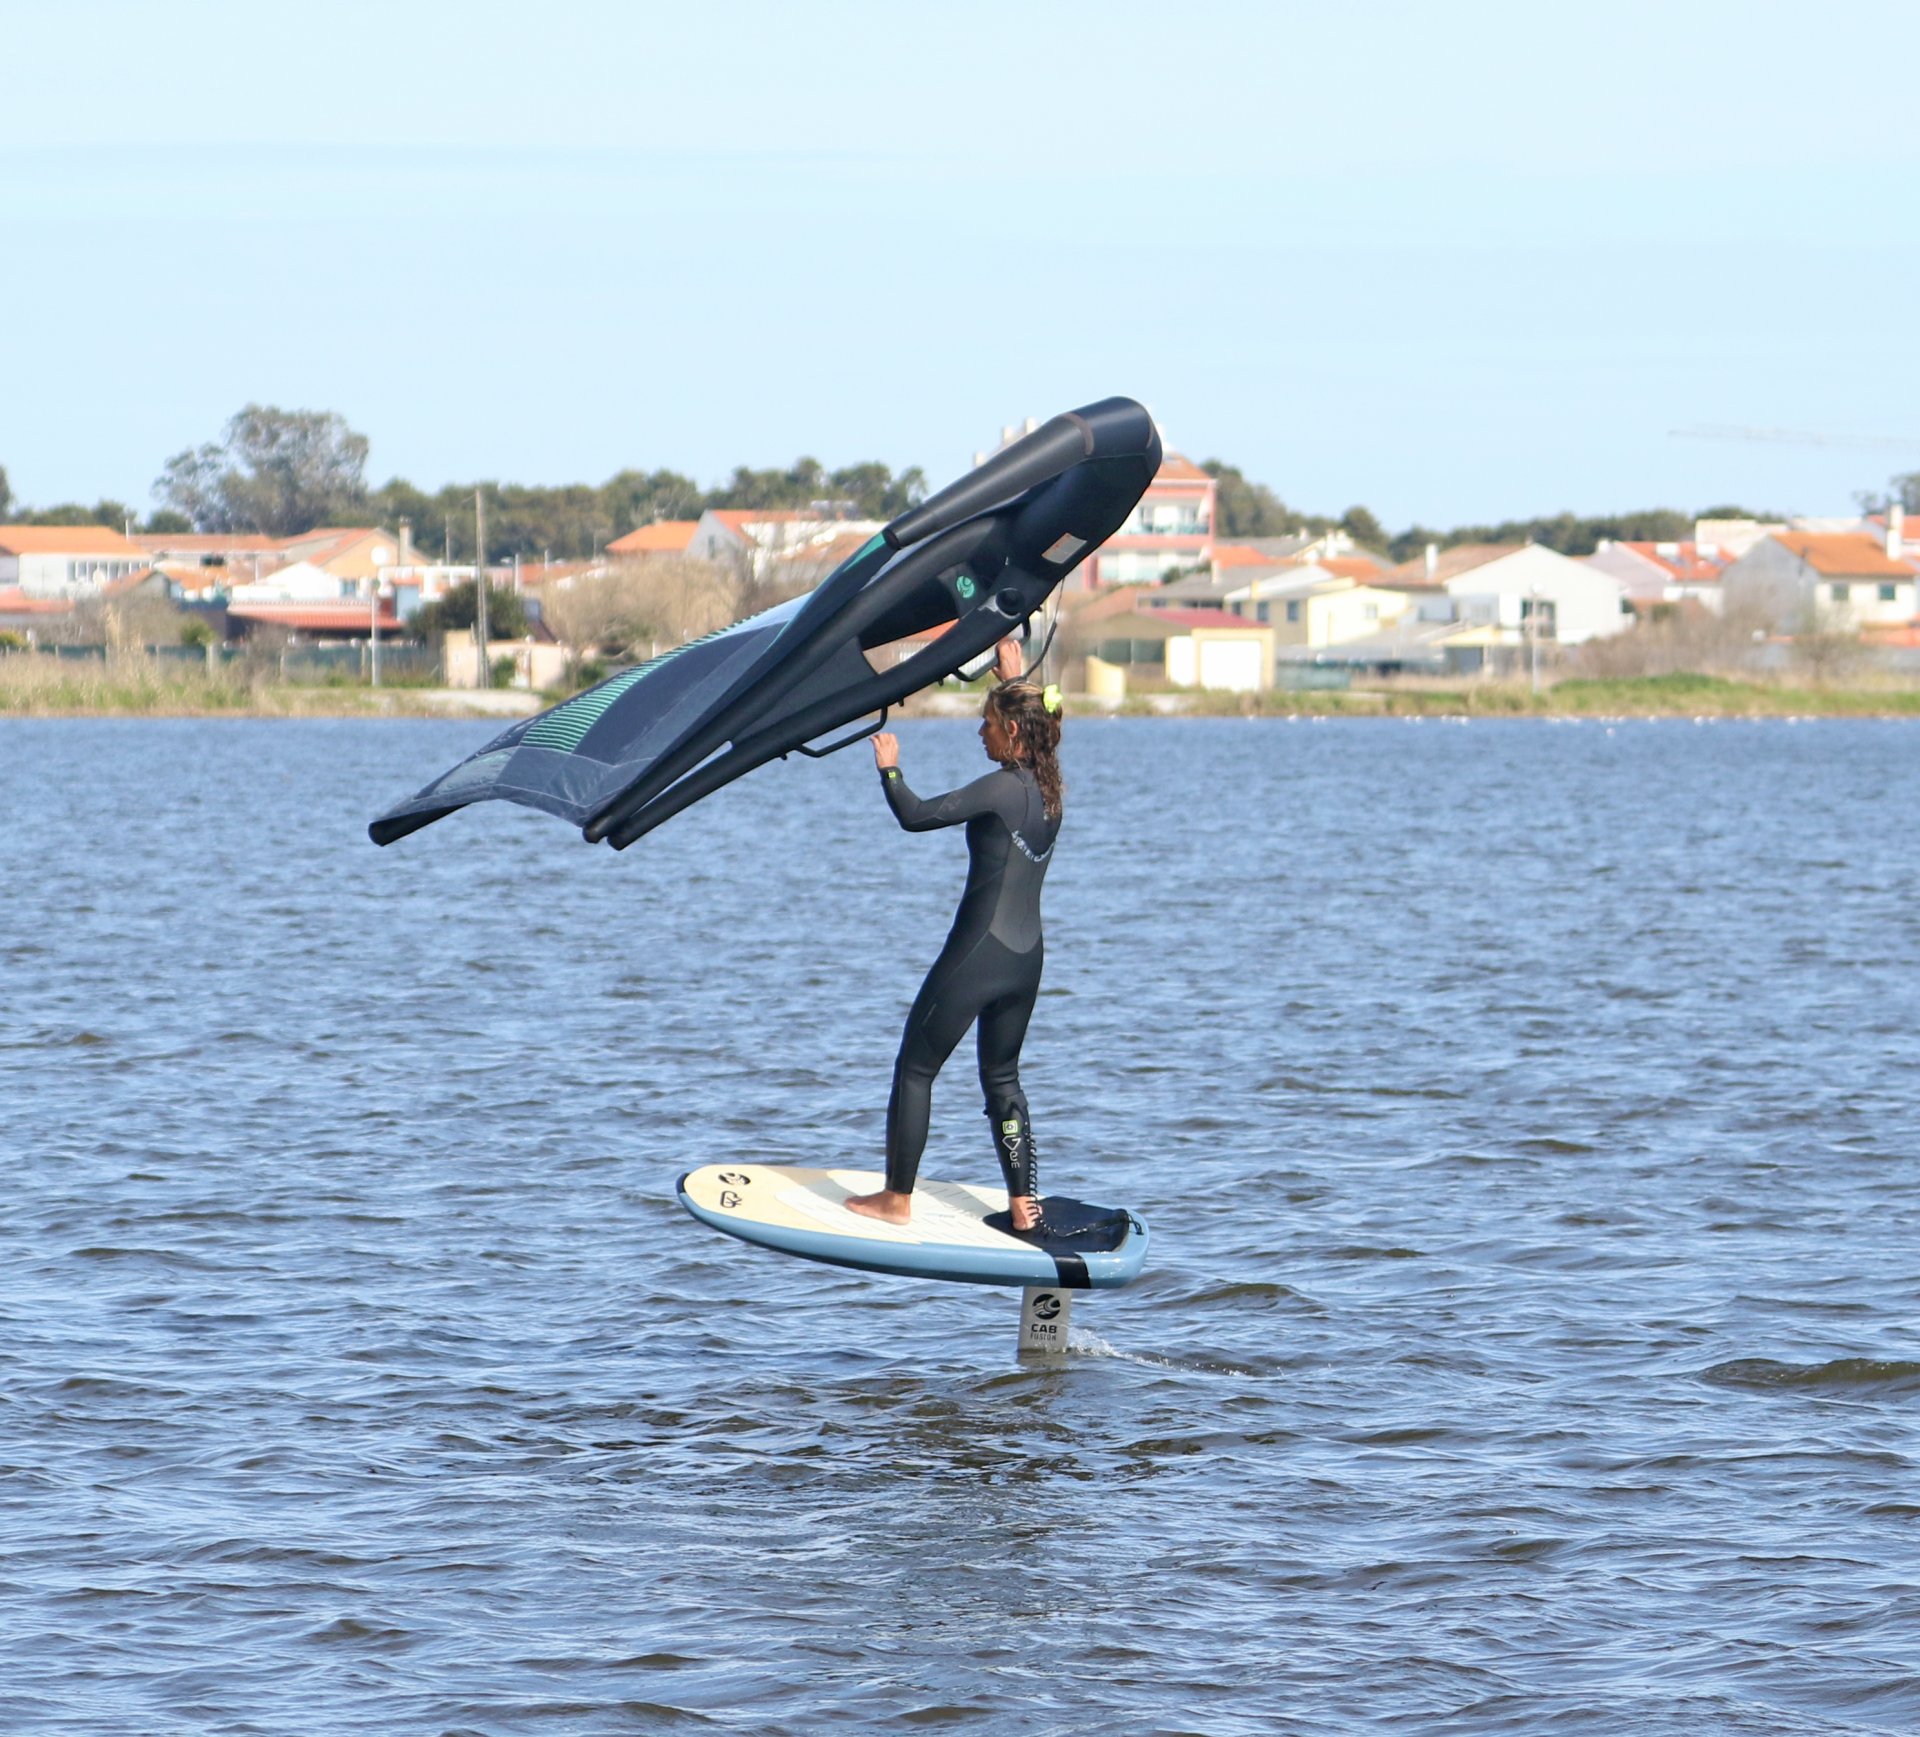
Timing. Pic E
As alluded to earlier, the wing flip on this gybe can actually be later than you think. Still in the downwind zone, but because the wing helps keep you in a balanced position there is no rush to let go. It won’t hurt if you release early, but holding the wing a tad longer can will help. However, when keeping the power on for longer, it’s important that you keep the wing pointing forward, and avoid steering it up. This photo is pretty much dead downwind and Karine is beginning to flip her wing. Note how she has kept the wing pointing to the outside of the turn and hasn’t steered it up. She’s sheeting out a bit before helping with a little back hand push. This way the wing doesn’t fly up. Karine still has both legs lightly flexed, her hips are turning, but she is looking downwind to stay over the board and manage her wing flip. If you turn and look around, your weight will drop back and turn the board sharply, knocking you off balance!
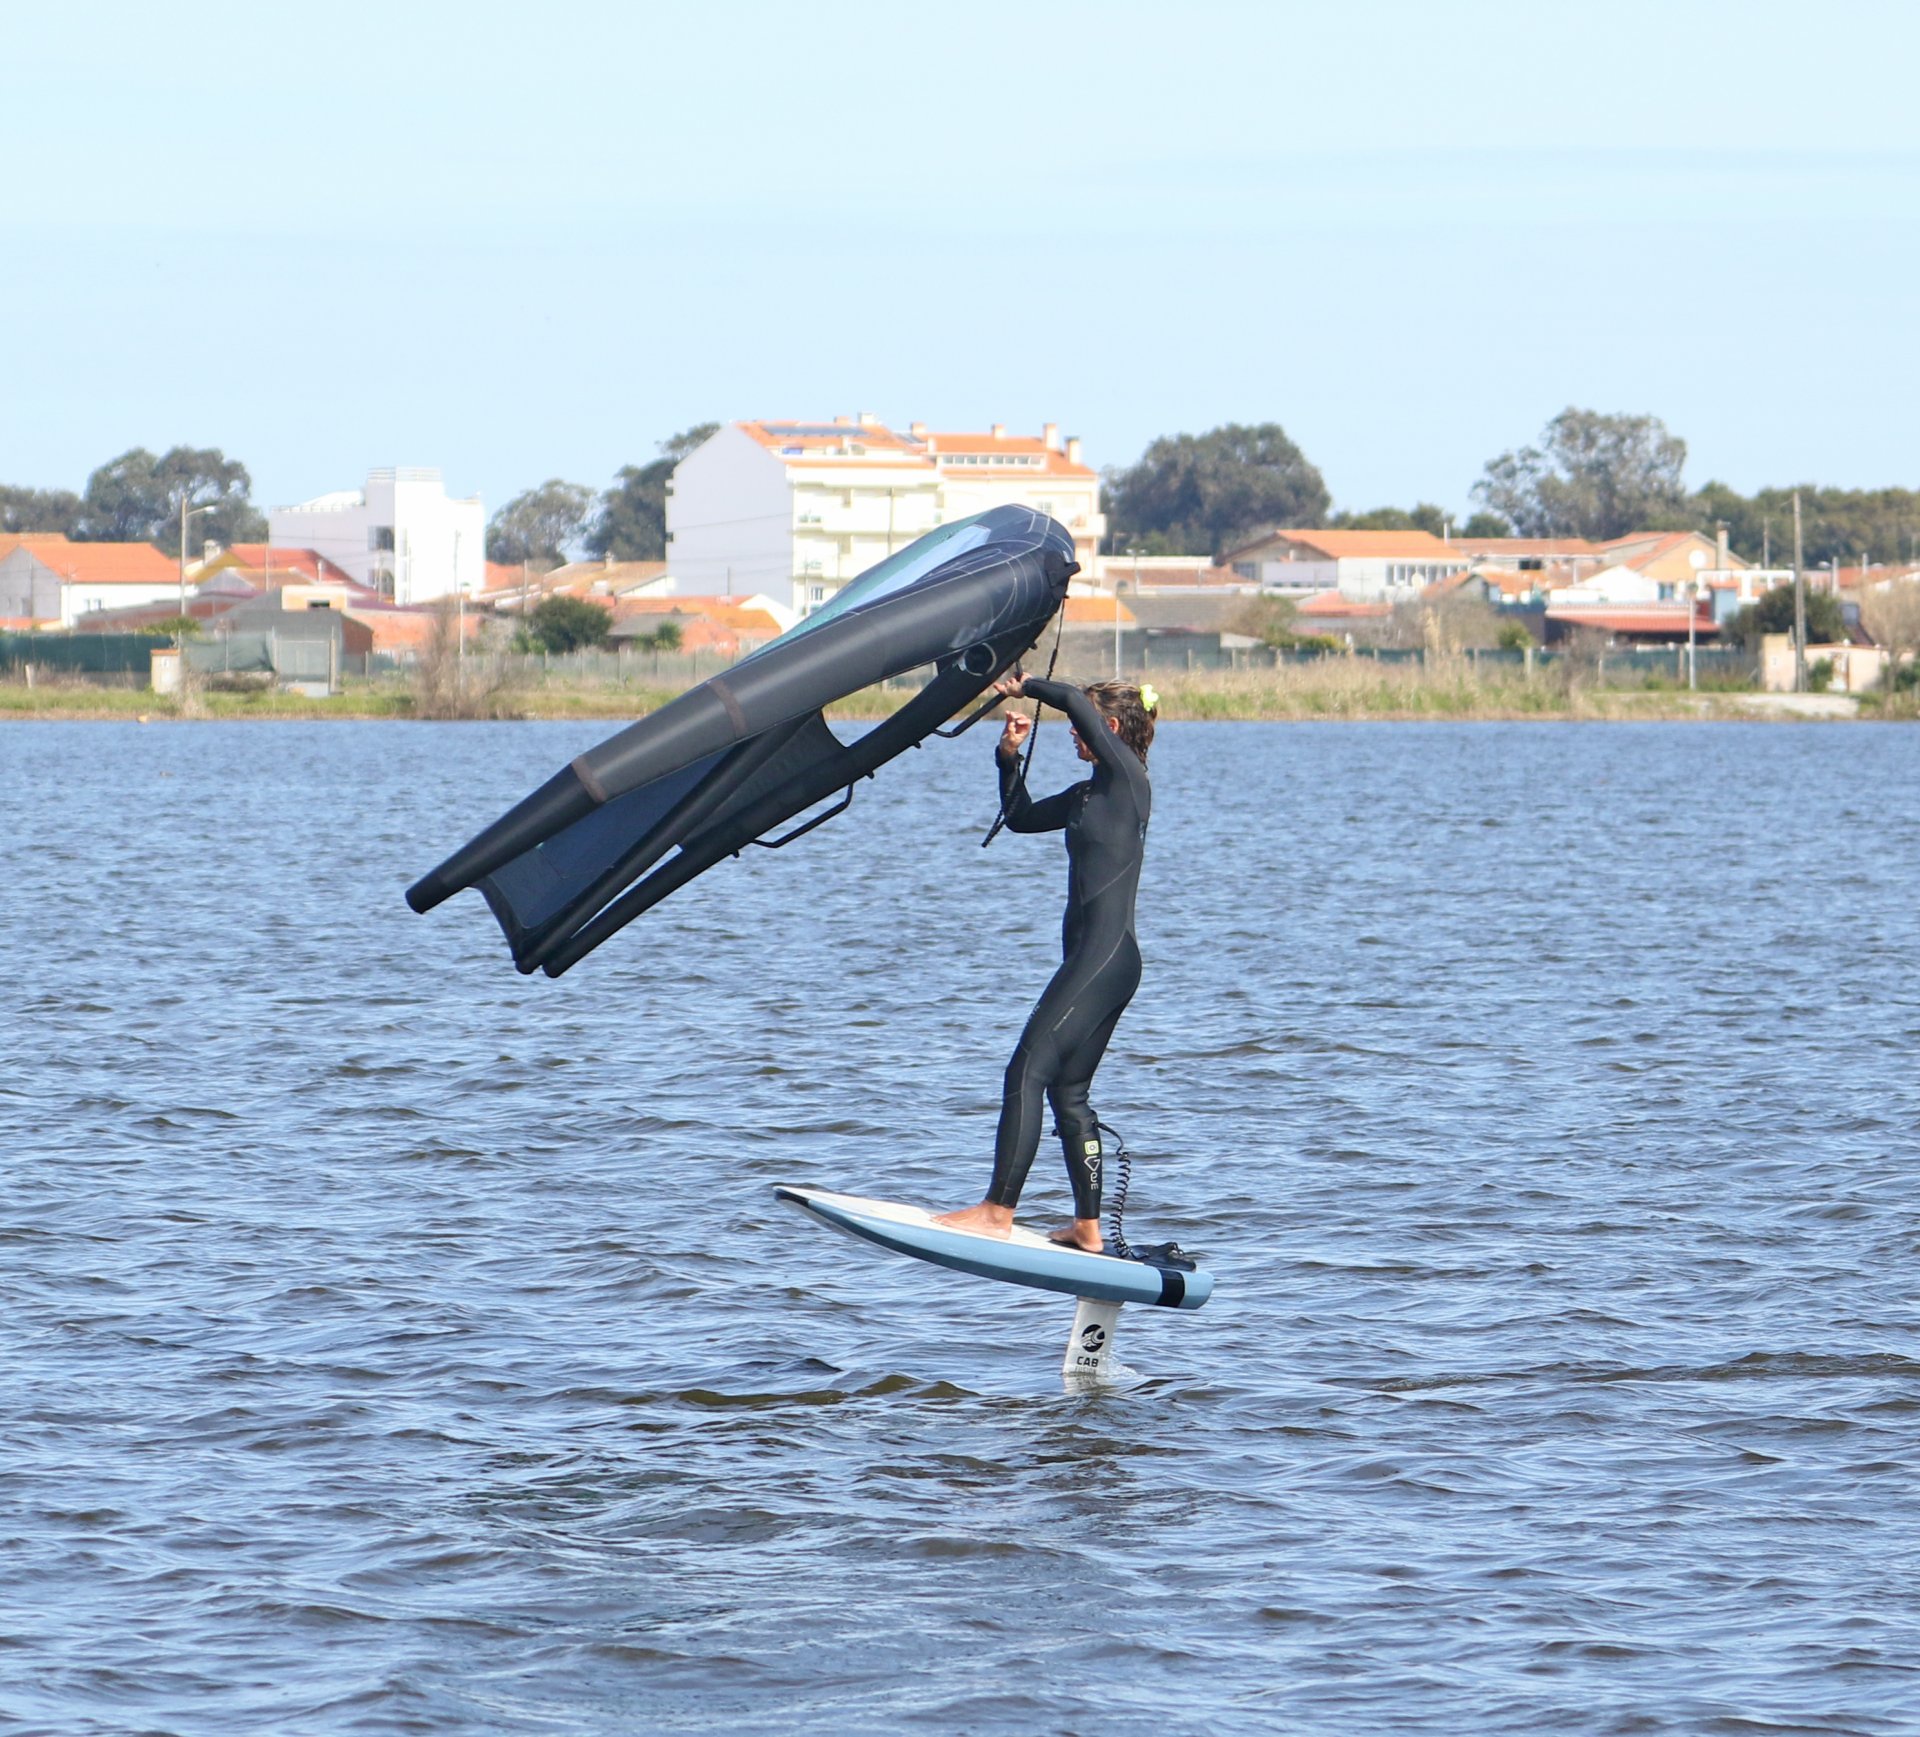
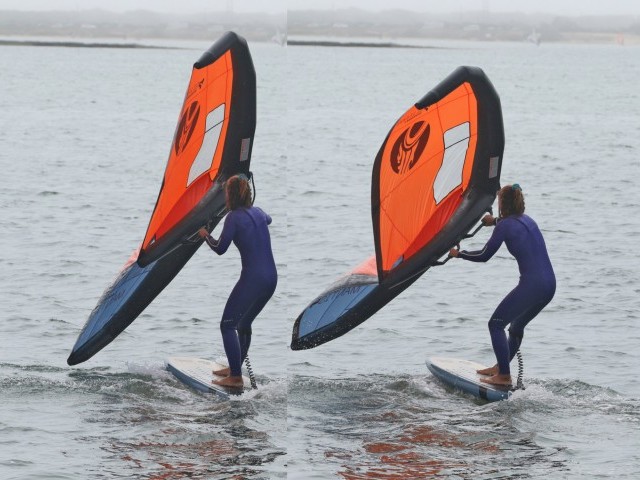
Hand Swap. Pic F
There are two points to consider in your hand swap, both of which you will have unwittingly practiced in your toe to heel woffing gybe from the last issue. The first is keeping the wing in front of you. This will be the first moment in your gybe when you don’t have any pull in the wing to keep you balanced on both feet. Instead of pull you can use the weight of your wing. To swap your hands bring the wing across in front of you rather than over your head. By not flying your wing up when flipping, it should be in the right position and stay forward. This will help keep your shoulders over the board and keep some weight on your front foot. Secondly, regardless whether you prefer an overhand or underhand grip, this forward position during this gybe allows you to easily go directly from overhand to overhand, or underhand to underhand, so you won’t necessarily require a post flip finger twist. Karine has her hands in front of her face, not over her head. You can see how her weight has dropped back because the wing is no longer holding her forward.
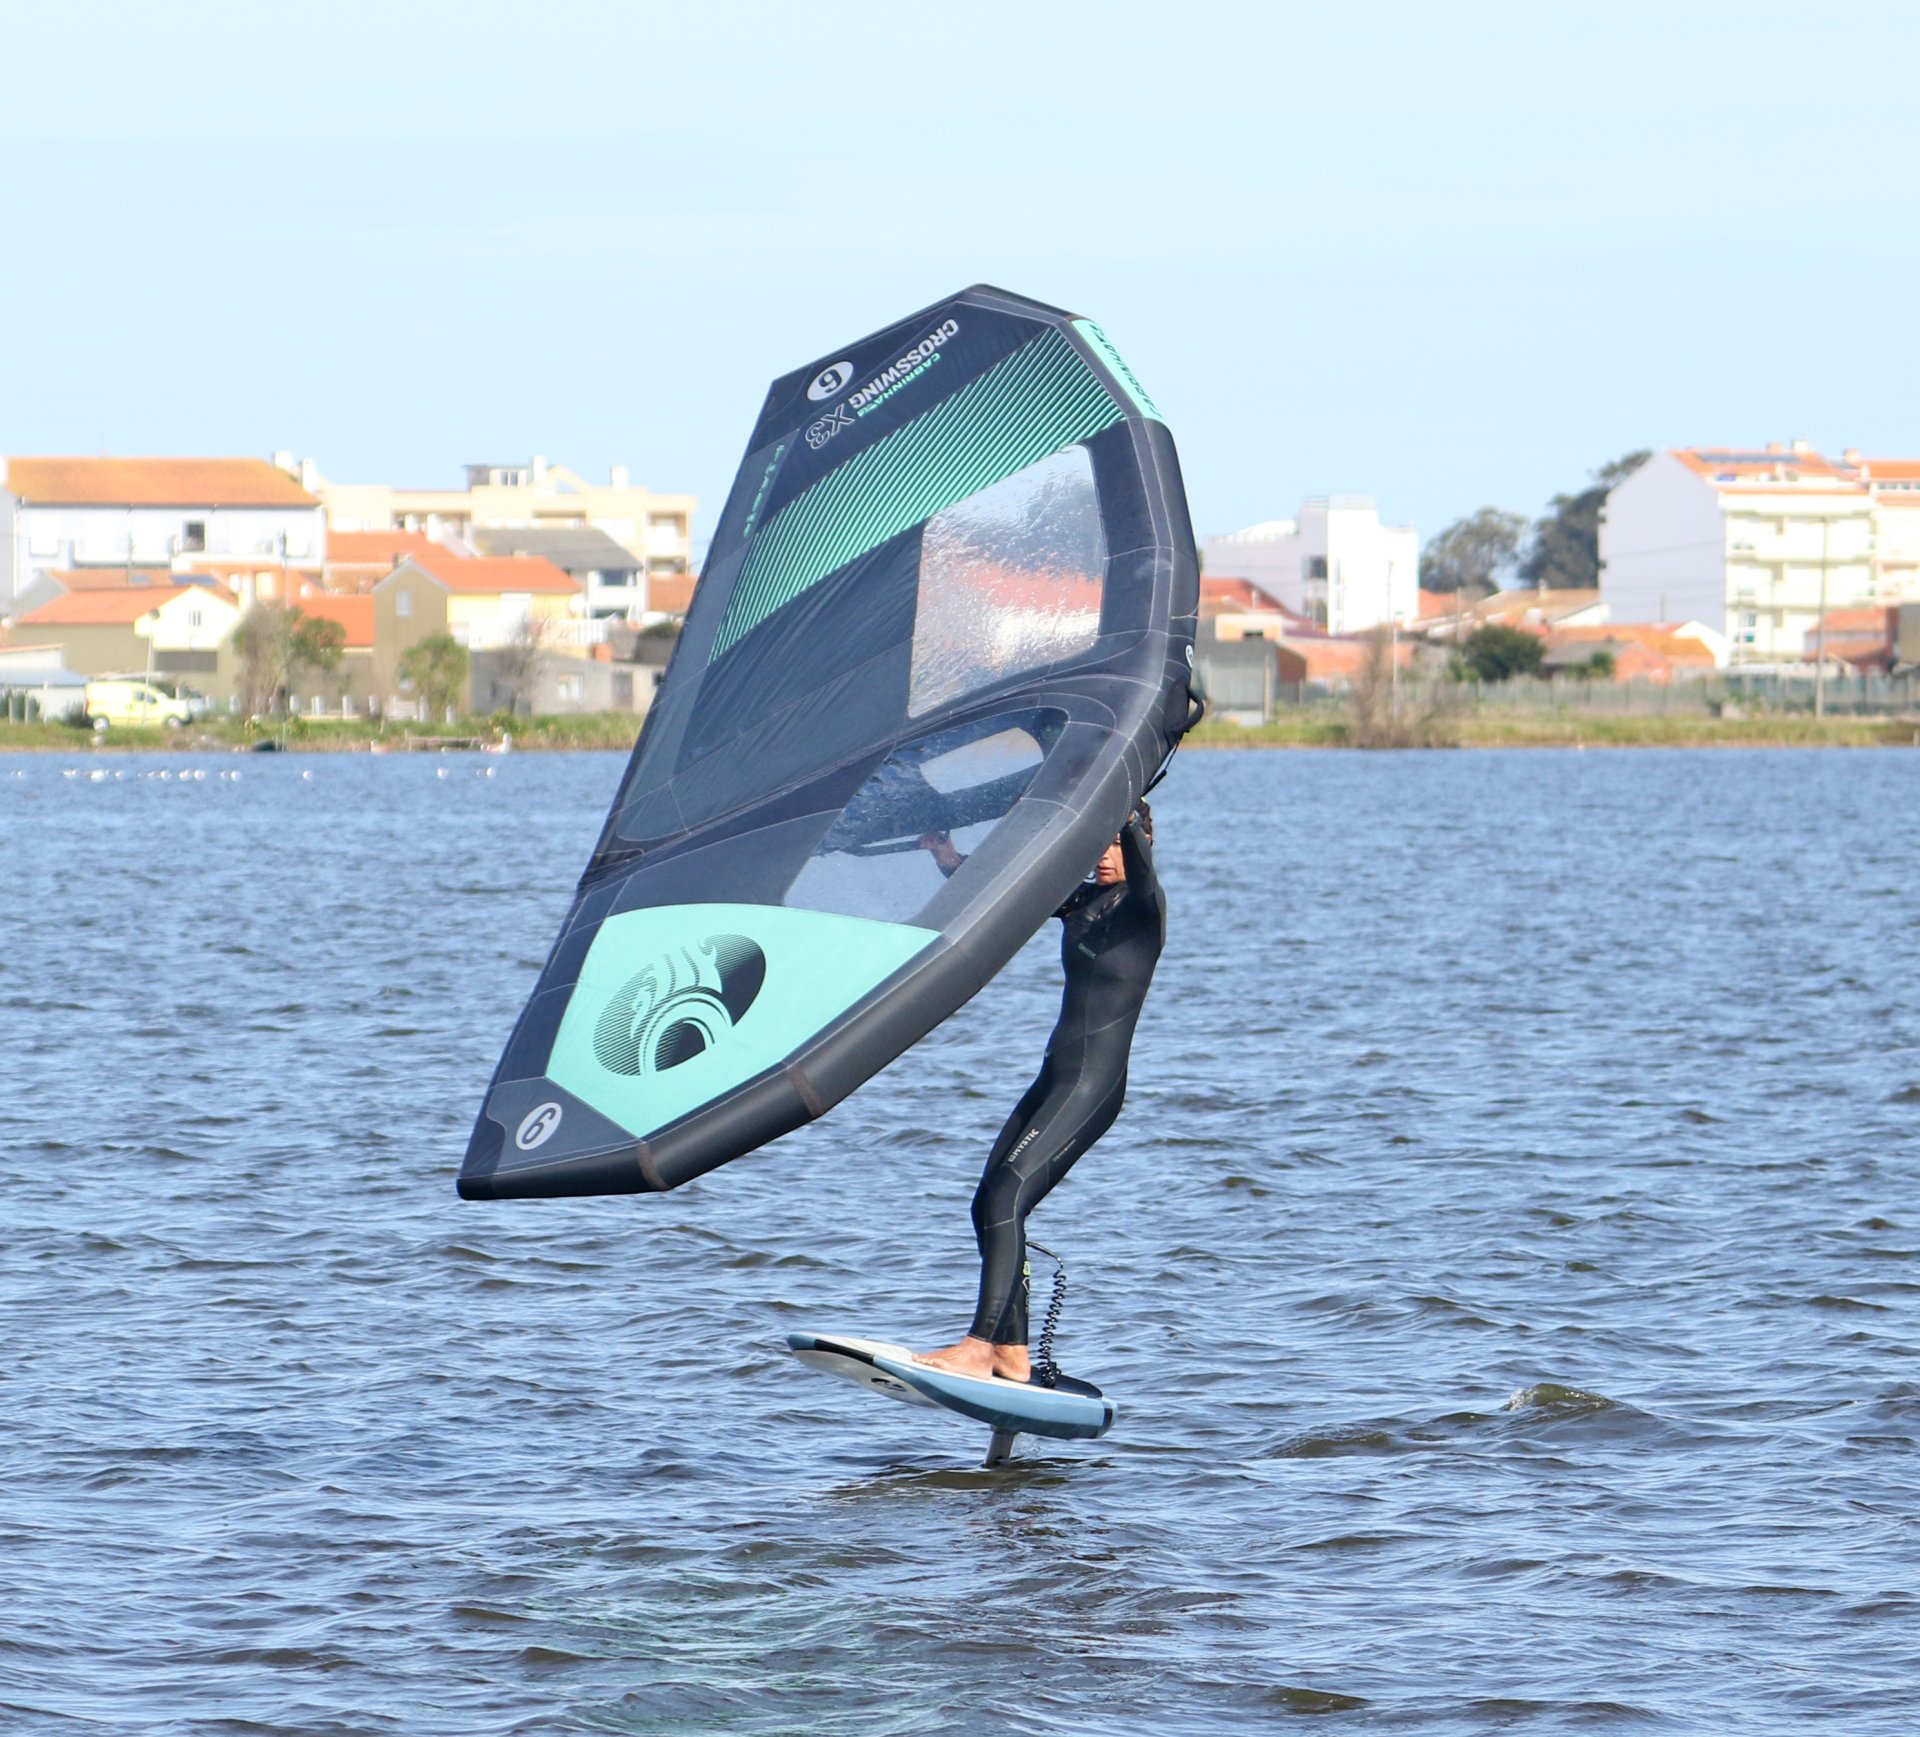
Front Hand Down. Pic G
To regain total control you need to get you front hand away from you. It’s oh too tempting to reach for the back handle and pull in to get the power back on. However, once you grab it, push your front hand away and guide your front arm around towards the nose of your board. This has the double benefit of pulling your weight forward and keeping the nose down, avoiding the dreaded post gybe stall, whilst also putting the wing into a position from which it can drive you forward in your intended direction, rather than lift you off balance. Look forwards overs the nose of your board as you do this, so that everything is moving in the same direction. Your aim is to come out and get the power on gently whilst on a broad reach. Karine takes hold of her back handle, but sheets in by pushing her front hand away and down, with everything heading in the same direction.

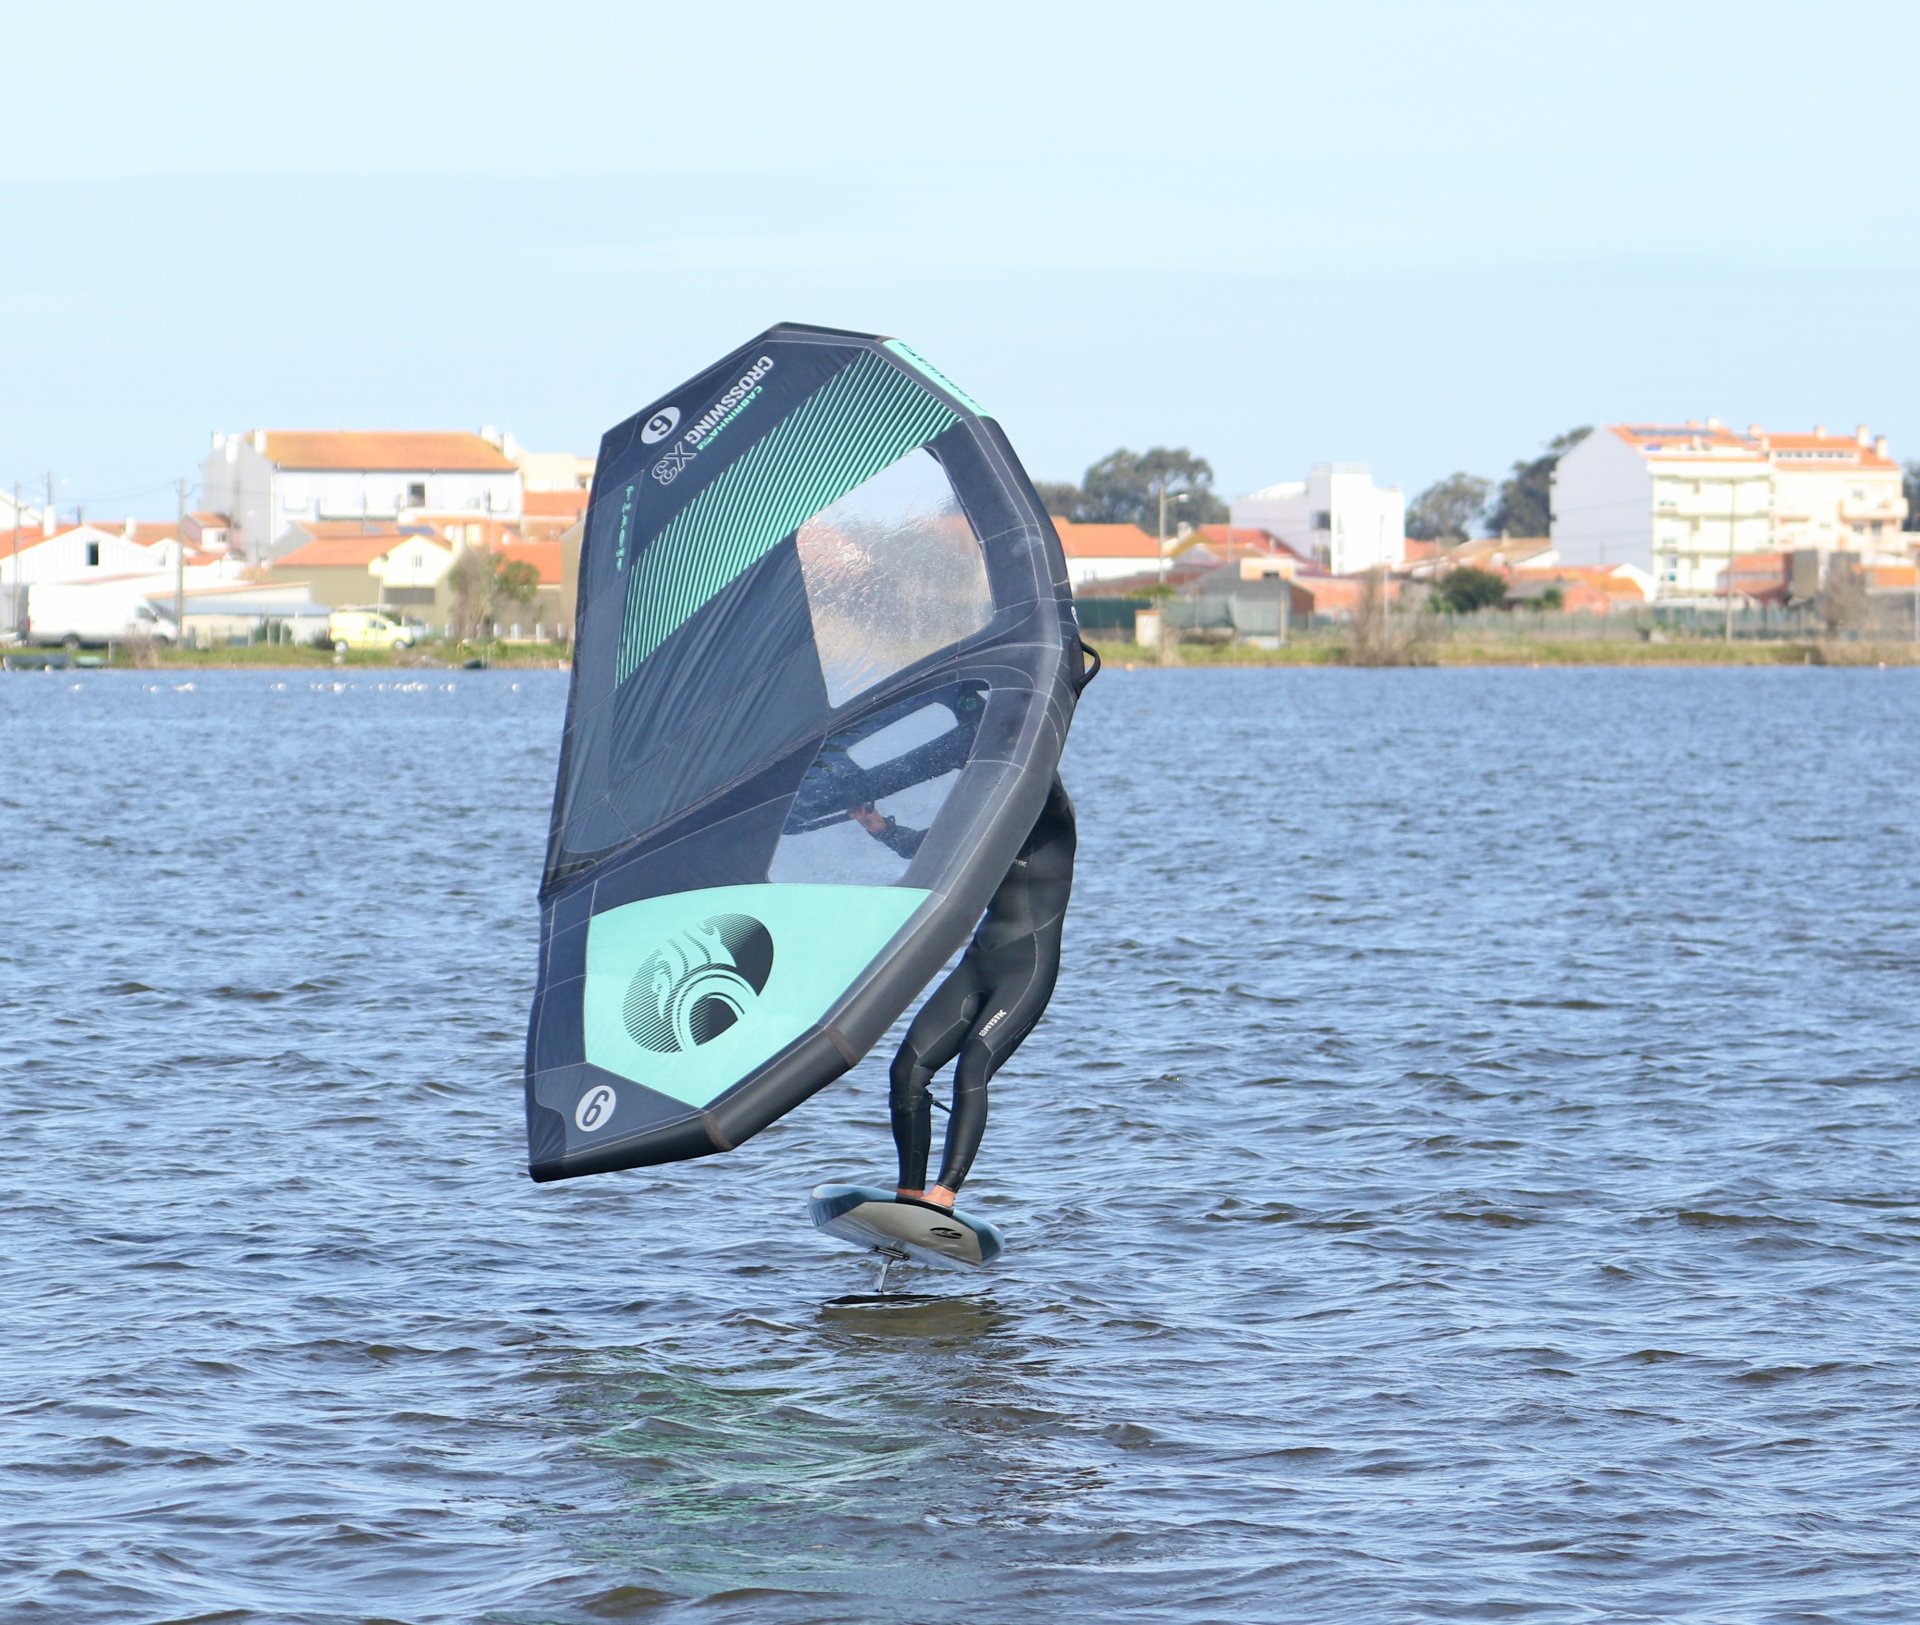
Finish Your Turn Pic H
Game on; you’re coming out strong foot first heel side, into a well-rehearsed stance. This should make staying up a little less difficult as it will be akin to coming onto the foil. You’re on a broad reach and as such the same principles apply. You can and should use the wing to help you. By concentrating on getting your front hand down and away from you you’ll counter the fact that your weight might be back and encourage forward drive. From this position, you can turn your head, move the wing back a touch, and drive against your back leg to turn yourself back onto an upwind course. Karine’s got power on; she’s balanced and now turns upwind.
Top Tips
As with the “other” gybe, it’s about keeping some power on. By this we mean having the wing sheeted to the wind and pointing towards the outside of the turn. In theory, this sounds great, but you need to feel the wing, sheeting out gently in relation to you, so that you keep it sheeted in, in relation to the wind!
Although it’s good to keep the power on for longer, you don’t want to end up with the wing pulling in a different direction to which you’re going, so err on the side of caution.
Unfortunately, it’s too easy to stall this gybe, as your weight drops back in the later stages. It can result from taking the wing up, turning your head and shoulders too much or sheeting in too early. The good news, even if you touch down, you’re already in a good solid heel side position to start over.
Look at the sequence to see the toe to heel foiling gybe step by step. Have a butcher's at the video and enjoy having a go once you get the chance.

All the best
C&K
This technique article was in Issue 15 of Tonic Mag.
Related
By Christian and Karine
